Thursday 8 August 2013

MY REVIEW ON THE COLOUR BUG BY KEVIN MURPHY


Here's a quick review of a hair product I used on a recent shoot :-)

With lots of coloured hair chalks on the market and the trend for temporarily colouring our hair with crazy colours I recently came across a product by international hairstylist Kevin Murphy called the Colour Bug.


The Colour Bug is a fun wipe in, wipe off colour that comes in 6 colours - orange, pink, purple, white, neon & shimmer

With easy application and quick removal by washing your hair, the Colour Bug also adds body and texture to the hair leaving it full of life.

My Review

Photographer: Shooting Beauty      Hair & Makeup by Jo Coletta 


Styling:
The model in the picture had really long hair and I wanted to create a shorter style.  This I done by adding texture with products and tonging random sections to create some movement. Tying a very low ponytail at the end of the hair with a clear elastic I rolled the hair up and underneath itself until I reach the nape of the neck.  I then pinned the roll into place with grips to secure. 

Keeping the front tonged pieces loose around the face I pulled out random sections of hair from the roll and tonged again to create loose curls.  This helped soften the look and to make it look more of a natural shorter style.

Application of the Colour Bug:
As advised on the directions of use, I used a cape for around the models shoulders and wore gloves.

I started by applying a styling product to the pieces of hair I was going to use the colour bug on. This is recommended to help the powder stick and dry to the hair.   I applied the bug a few times to create subtle Pink highlights.  I found by adding more pressure to the bug against the hair on application it made the colour darker.  

As I wanted to match the Pink to the models lipstick I only applied very light pressure.

To get more of an understanding on how to apply the Colour Bug I have included the YouTube video by Kevin Murphy. The video explains in full what the results will be on different hair colours.


The results I thought were great and it was really easy and quick to use.  I think it's definitely handy to have in your kit as a hairstylist as they're small and will last a while and perfect if you want to get creative!  

Also fab for anyone wanting to try them at home for a fun day/night out.  

Are they messy?
I had a little bit of product on the gloves I was wearing as I was using my hand underneath to support the hair I was applying it to and was rubbing it throughout the hair with my fingers so that was to be expected.

For any fallen colour from the hair after applying, I didn't notice anything on the models clothes or shoulders. So no mess!

Where to buy? To find your nearest stockist please visit


Can't wait to add the other colours to my collection!

Hope you enjoyed my review guys!

Love Jo x


SHARE:

HELLO KITTY BEAUTY SPA DUBAI


After recently returning from our holiday to Dubai, I had to share the fantastic morning we had whilst out there to celebrate my daughters 5th birthday.

After watching her mummy spend time manicuring the nails of others and always asking me to do hers, I read a blog by Mommy in Dubai a few months back about a Hello Kitty Beauty Spa that had recently opened in The Jumeirah Town Centre in Dubai. 

With Evie’s love of the famous brand I thought this would be perfect to take her along to for some birthday pampering.

I sent an email to the spa who forwarded me an age-graded ‘Queen’ and ‘Princesses’ price list to choose our treatments.

I asked Evie what she would like and we booked the Kitty Mani-Pedi Combo priced at just 110 Dirhams (£19.00).

On arrival at spa, we were greeted by the lovely ladies who worked there, who chaperoned us to the spa area and Evie was helped into a mini Kitty robe before starting her treatments.  The entire spa décor was beautiful!

The Decor - Hello Kitty Spa Dubai

Starting with the Kitty Cure Mani Evie’s hands were treated to a scrub, file, massage and Pink nail polish what Evie had chosen from the huge collection! Evie then opted to have some nail art for her ring fingers.

Hello Kitty beauty Spa Nail Art

While her hands were drying she then continued her treatments with her pedicure and went for a bright pinky/orange colour on her toes.

They had a fantastic collection of merchandise and mini cafe in the reception area that served hot beverages, fresh juices and cute Hello Kitty cupcakes.


Hello Kitty Beauty Spa Reception Area


For my birthday girl I treated Evie to some Hello Kitty flip flops to complete the look and a yummy chocolate cupcake!


We absolutely loved our morning at the spa and we'll definitely be visiting again! I want to thank all the lovely ladies who work there and making it so much fun for Evie & myself! It was definitely a birthday to remember.

Everything was so reasonably priced. At just a total of 190 dirhams (£33.00) that included the treatments, the nail art, Evie's flip flops and Cupcake.

Next time, I think i'll be joining in and choosing a few of the treatments from the Queens treatment menu.

For those who would like more details please visit their website where you can also enquire about hosting a party there for a special occasion. They also run some fantastic deals.

Their Opening Hours are:
Open Daily from 10am - 10pm
To Book:
+971 4 344 9598

Town Center, Dubai

Has anyone else visited the spa? I would love to know what you thought?

Love Jo x


SHARE:

Saturday 3 August 2013

MY ONLINE SPRING SUMMER 2013 CLOTHING HAUL

For those of you who have read my previous posts and noticed my love of online shopping, here’s a little look at to what I’ve been buying recently from some of my favourite sites. As always I love shopping for a bargain and as you will see I’ve managed to bag a few lately! Some of which I can carry through to Autumn/Winter.

My love of Alexander Wang continues! Can’t help but love anything from this designer’s collections…

A few weeks back The Outnet had one of their Clearance Sales where all items are discounted up to 85%. This runs for a few days and the bargains are incredible.  You have to be quick with your decisions as everything goes really fast but I was lucky enough to purchase a couple of items I had my eye on and that were already stored in my wish list.

ALEXANDER WANG

Rib-trimmed twill jacket

Original price £495
SALE £74.25
85% OFF

ALEXANDER WANG

Leather-paneled wool-twill pants

Original price £470
SALE  £70.50
85% OFF


These were other recent buys from The Outnet, non clearance but still discounted up to 60%

T BY ALEXANDER WANG

Jersey dress

Original price £70
Sale  £38.5045% OFF


T BY ALEXANDER WANG

Classic jersey T-shirt

Original price £65
Sale  £29.2655% OFF


T BY ALEXANDER WANG

Siro ribbed-knit cotton track pants

Original price £130
Sale  £5260% OFF


CURRENT/ELLIOTT

The Perfect chambray shirt

Original price £200
Sale  £8657% OFF

From Net-a-Porter SS13 Sale


THAKOON ADDITION

Angry Leopard stretch-cotton shorts

Was £232 Sale £11650% OFF

Levi's 

LEVIS BOYFRIEND SKINNY JEANS

Recylcled Punk 

Was £95.00 Sale £46.90 


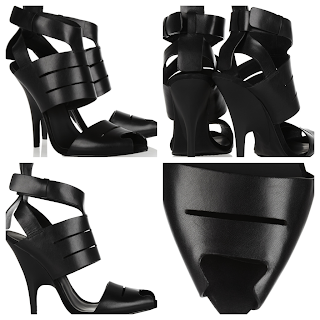
Lastly from The Outnet my Alexander Wang Nadia shoes!  I have wanted these shoes for so long now and received them from my hubby as a gift for my recent birthday. With a good 50% off they were worth the wait and a massive saving on his pocket! They're the most comfortable shoes I own and go with so much that's already in my wardrobe. They look great with the track pants and boyfriend jeans from this post.

ALEXANDER WANG

Nadia cutout leather sandals

            Original price £420 SALE  £210 50% OFF

Here I am celebrating my birthday wearing my Thakoon Addition Shorts, an LNA T Shirt and my new shoes. 


Hope you enjoyed my post and have a fab weekend!
Love 
Jo x


SHARE:

Thursday 1 August 2013

GET THE LOOK - NOIR EYES

Here's a simple step by step guide on how to achieve the below look I done on Britain & Irelands Next Top Model Anastasija Bogatirjova for Shooting Beauty...


 The Look

After prepping the skin with Benefit Pore Professional and Lucas Papaw on the lips I started first by concealing the eyes using my Bobbi Brown BBU Palette.

Eyes: Using Ellis Faas Creamy Eyes in Deep Black (E103) I applied this all over the eye lid and lower lash line ensuring it was applied very close to the base of the lashes so no skin was visible. Then blending outwards to create the winged effect and around the edges to soften I used a MAC 217 soft brush.

Using MAC Blackground I applied this with a MAC 235 flat eye shadow brush to the lid area to intensify the colour including the lower lash line and added a touch of Illamasqua Liquid metal in Silver to the inner corner on both eyes.

I then pencilled the upper and lower waterline with Avon Supershock Gel Eyeliner and applied MAC Zoom Lash Mascara in Black using disposable mascara wands from Victoria Loves Beauty.  

Face: For the foundation & concealer I used my Bobbi Brown BBU palette with a Shu Uemura Natural No 18 foundation brush and a MAC 195 concealer brush.

Cheeks: I slightly contoured the cheeks with my contour palette from MAC. Not adding any Blusher and powdered with Shu Uemura Matte Face Powder.

Lips: I blotted the lips with tissue paper to remove the excess Lucas Papaw and with my foundation brush that still contained a little product brushed over the lips to lighten them slightly.

Once I finished the look I then patted a tiny amount of MAC clear gloss to the centre of the eyelids to give a slight wet look.

Hope you enjoyed this step by step guide and if you try this look at home don't forget to send me a pic! 

Love
Jo x

Products used...

Skin Prep: Benefit Pore Professional & Lucas Papaw
Brushes used:
Shu Uemura No14 Foundation Brush
MAC195 Concealer Brush
MAC 235 Eyeshadow Brush
MAC 217 Blending Brush
Makeup Products:
Bobbi Brown BBU Palette
Ellis Faas Creamy Eyes E103 Deep Black
MAC Blackground Paint Pot
Avon Supershock Gel Eyeliner
MAC Zoom Lash
MAC Clear Gloss


SHARE:
© JO COLETTA. All rights reserved.
MINIMAL BLOGGER TEMPLATES BY pipdig